Tuesday, November 9, 2010

As promised, my Osso Bucco step by step...

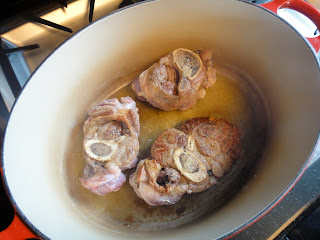
So here it is (à la demande générale, as we say in French)!  My classic osso bucco recipe, step by step with pictures!  There is no way to mess this up, it is super easy, but so tasty.  Try it once and you'll be hooked for life!

Classic Osso Bucco

  • 4 to 6 veal shanks
  • 1/4 cup flour
  • Salt and pepper
  • 2 tablespoons olive oil
  • 2 tablespoons butter
  • 2 onions, chopped
  • 2 carrots, chopped
  • 1/2 bottle dry white wine
  • 14.5-ounce can plum tomatoes, chopped
  • 3 garlic cloves, chopped
  • Grated zest of 2 oranges
  • 1 cup veal stock, or beef stock (more, if needed)

Heat the oven to 350°F. Put the flour on a plate, add generous amounts of salt and pepper, and coat the veal slices, with flour, patting to remove excess.


Heat the oil and butter in a Creuset or in an oven-proof pot big enough for all the veal slices to touch the bottom. Add half the slices and sear them over high heat, 2 to 3 minutes. Turn them, brown the other side and remove them to a plate. Brown the remaining slices and remove them also.


Lower the heat to medium, add the onion and carrot and sauté until brown, 5 to 7 minutes.


Pour in the wine and boil until reduced by half, stirring to dissolve the brown bits at the bottom.


Stir in the tomatoes, garlic, orange zest, veal or beef stock, salt, and pepper. Immerse the veal slices in the sauce (the sauce should come at least halfway up the sides of the shanks.) Cover the pan and bring it to a boil.


Transfer to the oven, and braise the shanks until the meat is very tender and falling from the bone, 1 1/2 to 2 hours. Stir from time to time, gently turning the slices, and if the pan seems dry, add more stock.

Serve with Gremolata (see recipe below).

Gremolata

  • 4 garlic cloves, chopped
  • One bunch of Italian (flat-leaf) parsley
  • Grated zest of 2 lemons
Remove stems from parsley, and chop the leaves together with the garlic. Stir in the grated lemon zest and pile the gremolata in a bowl.


    Party Favors for Baby Shower

    Maple Fudge for all!  What a great way to please your guests!  Way better than inedible party store candies, in fact, you can't even compare!  The beauty of this is that the boxes can be customized to fit the sex of the baby, or even the event!  Wedding favors, anniversaries, birthdays, showers, bachelorette parties...  It's infinite what can be done with these!


    Tuesday, October 5, 2010

    Sooooo busy these days!

    I have a wonderful new project going on. It keeps me busy, very busy. But creativity is a double-edged sword; it keeps you alive and makes you dream, but it also keeps you awake at night and on your toes, 24/7. Rest assured, I am not complaining, but seeing it is now 4:30 in the morning and that I haven't closed my eyes yet, let's just say that I am on the latter edge of the sword today.

    But the beauty of my new venture is that it involves food, lots of it. So it pleases me to be able to stay awake because I worry about food. I'd rather worry about food than about closing day at NYSE.

    I want to share with you in the next few days my osso bucco recipe. I took pictures of all the steps when I made it last Saturday. It will be up very soon, I promise. In fact, as soon as I can pack a few more hours rolling in bed.

    Fall has arrived for good in Chicago. The leaves are turning all shades of yellow, orange and brown, at lightning' speed it seems. But this also means that our house will be slowly coming up. We are expecting demolition in the next few days, which should take about a week, and then time to build from the ground up! It is quite exciting! The choices, the materials, the colors, the textures, the disposition... All that makes for more sleepless night, filled with creative ideas and head full of thoughts. I can only imagine the life of an artist. Wait... Aren't we all artists in our own way?

    Tuesday, September 28, 2010

    The results, the weekend, the sauces and the pleasure!

    So what!?  Yes, I am guilty!  I cooked all weekend!  I did not (or almost did not) touch a computer all weekend! I am guilty of cooking and enjoying my close relationship to food.  Cooking is the closest relation to human contact that we have.  We eat our food.  We deliberately put other substances in our mouth to feed and satisfy ourselves.  So why not make the best of it?  Make the best food, be on a mission to cook and savor the most magnificient food ever!  I think this is the path to good health and perfect balance.  Cook at home.  A lot of veggies (but add olive oil, salt, pepper), bake them, broil them, vapor them, sauté them, anyway you want it, but never overcook them!

    So here is one of the best recipes for me for the October 2010 issue of Food & Wine: Lamb Ragout with Olives and Peppers.  That lamb was succulent, different, easy to put together and so worth the time.  Because remember that a long overall time for a recipe doesn't mean "hard" or "complicated".  If you're home on a Sunday afternoon, put this baby in the oven, wait for the in-laws and have enough lamb for all.  That is why I would put a little more than the required amount of ingredients, for the whole recipe.  And remember to add some veggies on the side.

    Lamb Ragout with Olives and Peppers

    • 1/4 cup canola oil
    • 4 pounds boneless lamb shoulder, cut into 2-inch chunks
    • Salt and freshly ground black pepper
    • 2 large white onions, coarsely chopped
    • 4 celery ribs, coarsely chopped
    • 3 carrots, coarsely chopped
    • 1/4 cup tomato paste
    • 1 cup dry red wine
    • 10 cups water
    • 1 tablespoon unsalted butter, softened
    • 1 tablespoon all-purpose flour
    • 3/4 cup sliced pitted Picholine olive.
    • 3/4 cup sliced roasted red pepper.
    • 2 tablespoons chopped tarragon
    • 2 cups Israeli couscous 
    1. Preheat the oven to 250°. In a large enameled cast-iron casserole, heat the oil until shimmering. Season the lamb with salt and black pepper and add it to the casserole. Cook over moderately high heat, turning the pieces once or twice, until deeply browned, 15 to 18 minutes. Transfer the lamb to a platter.
    2. Add the onions, celery and carrots to the casserole. Cover and cook over low heat just until softened, about 5 minutes. Add the tomato paste and cook over moderately high heat, stirring until the paste is lightly browned, about 5 minutes. Add the wine and cook, scraping up any browned bits stuck to the pot, until nearly evaporated, about 5 minutes. Add the water, season with salt and bring to a boil. Return the lamb and any accumulated juices to the casserole. Cover and braise in the oven for about 2 1/2 hours, until tender.
    3. Transfer the lamb to the platter. Remove any fat and gristle and coarsely shred the meat. Strain the broth and discard the solids. Skim the fat from the surface of the broth. Return the broth to the casserole and boil until reduced to 4 cups, about 30 minutes.
    4. In a small bowl, mix the butter with the flour to form a paste; whisk it into the broth and simmer until thickened, about 5 minutes. Return the lamb to the sauce. Add the olives, red peppers and tarragon and keep warm.
    5. Bring a large pot of salted water to a boil. Add the couscous and cook until tender, about 5 minutes. Drain the couscous and transfer to shallow bowls. Spoon the lamb ragout over the couscous and serve. 
    Source: Food & Wine, from Chef Recipes Made Easy: Simple Wine-Friendly Recipes, published October 2010

    Lamb Ragout with Olives and Peppers

     Make this recipe, you will not be disappointed.  Make sure you add a little more of everything.

    "Vegetables are a must on a diet.  I suggest carrot cake, zucchini bread, and pumpkin pie."  ~Jim Davis

    Friday, September 24, 2010

    The Results, TGIF, and a cooking weekend ahead

    It is Friday, finally!  After a week of slacking, I have ahead of me a weekend of meat sauce, marinara sauce, chicken à la king, and maple fudge!  Yes, the orders are coming in, and I love it!  I really appreciate cooking for others, more so than cooking for myself, and it's a real treat to be able to reach more people with Haute Cuisine!  So I will be spending this coming weekend cooking, canning, dressing up the jars!

    Batch of Meat Sauce with Fresh Herbs


    So because of all this cooking, I will be taking a break (yes, another!) from the Food & Wine magazine.  We are going out to eat Saturday and Sunday, so there won't be any recipes to post, but great restaurant experiences and reviews!  Yesterday, however, I made the Pork Scaloppine with Cabbage, and I am really happy I did as it turned out great.  I was quite skeptic before, but a few bites of this warm salad type dish and I was convinced to add it to my repertoire of recipes I would be willing to make again!  The crispness of the barely cooked cabbage really complemented perfectly the savoriness of the pork.  And cabbage (especially red) is so good for you.  Red cabbage is packed with anthocyanins, healthful compounds from the flavonoid class of plant nutrients),   We both finished our plates and could not wait for lunch today to have the leftovers.  Please note that I made my recipe using good balsamic vinegar instead of vin cotto.  Here is the recipe and a picture:

    Pork Scaloppine with Cabbage

    • 1 1/2 pounds boneless pork loin roast with at least 1/4-inch cap of fat
    • Salt and freshly ground pepper
    • 1/2 cup walnuts
    • 1/4 cup red wine vinegar
    • 3 tablespoons vin cotto, plus more for drizzling (see Note)
    • 1 small shallot, minced
    • 1/4 cup plus 3 tablespoons extra-virgin olive oil
    • All-purpose flour, for dredging
    • 1 pound red cabbage, thinly sliced
    • 1 large red-skinned or Bosc pear, cored and cut into thin sticks 
    1. Preheat the oven to 325°. Trim the fat from the top of the pork loin and cut into thin strips. Spread the fat strips on a large rimmed baking sheet, season with salt and pepper and bake for about 25 minutes, until the fat is melted and the cracklings are browned and crisp. Transfer the cracklings to paper towels to drain. Pour the melted fat into a small bowl; you should have about 2 tablespoons.
    2. Spread the walnuts in a pie plate and bake for 10 minutes, until golden. Let cool and coarsely chop. Reduce the oven to 300°.
    3. Trim off any silver skin from the pork loin and slice the meat crosswise into 4 pieces. Set each piece between 2 sheets of plastic wrap and pound to an 1/8-inch thickness.
    4. In a small bowl, whisk the vinegar with the 3 tablespoons of vin cotto, the shallot and 3 tablespoons of the olive oil. Season the vinaigrette with salt and pepper.
    5. In a large skillet, heat 2 tablespoons of the olive oil until shimmering. Season the pork scaloppine with salt and pepper and dredge in flour, shaking off the excess. Add 2 of the scaloppine to the hot oil and cook over high heat until browned, about 1 1/2 minutes. Turn the scaloppine and cook for about 20 seconds longer. Transfer the scaloppine to a large rimmed baking sheet and keep warm in the oven. Cook the remaining scaloppine in the remaining 2 tablespoons of olive oil.
    6. Pour off the oil in the skillet and wipe it out. Add the vinaigrette and the melted pork fat to the skillet and warm over moderately high heat. Add the cabbage and pear and toss until warm, 30 seconds. Transfer the salad and scaloppine to plates and garnish the salad with the cracklings. Sprinkle with the walnuts, drizzle with vin cotto and serve. 
    Source: Food & Wine, from Best Pairings for Italian Wines, published October 2010

    Pork Scaloppine with Cabbage

    Have a great weekend readers, and make sure to eat tasty homemade food!  Bon appétit!

    Thursday, September 23, 2010

    One word: SLACKER!

    Ok, ok, I am so sorry!  Yesterday, because of the lack of inspiration brought upon by the Scaloppine, I decided to slack off and order Big Bowl!  I love their pad thai, I think it might be one of the best in the city.  So here are the remnants of yesterday's portion that I furiously ingested after a hard core session of Hot Yoga (sorry for the fork, but after training, chop sticks are just not for me :)!


    So tonight, I will go ahead and do the Pork Scaloppine with Cabbage, no excuse!  Will keep you posted tomorrow!  Bon appétit!

    Wednesday, September 22, 2010

    The Results and the Next Challenge - Day 7

    Ok, I have to admit it, I am getting a little tired of the main courses in the issue of Food & Wine...  Tonight, I will try the Pork Scaloppine with Cabbage, but tomorrow, I might do a few appetizers/starters instead of a main.

    Good news though, the Mushroom-Sausage Ragù served over polenta from yesterday night was really nice!  I used Rustic Coarse Polenta Integrale, from Anson Mills (www.ansonmills.com), which was the best polenta I ever had!  I love mushrooms, so this recipe is definitely for me.  If you love morels, you're good to go!  The only downside is that I did not take a picture...  We were reviewing the house plans with the architect, and the picture totally slipped through the cracks...  Sorry readers!  Will get back on track here tonight!  I promise to make the recipe again though and will post then.  You should try it too, it's fast and easy, and you can make ahead of time.  Here it is:

    Mushroom-Sausage Ragù

    • 1 cup dried morel mushrooms
    • 2 tablespoons olive oil
    • 2 sweet Italian sausages
    • 1/2 pound shiitake caps, quartered
    • Salt and freshly ground pepper
    • 2 thinly sliced shallots
    • 6 water chestnuts, sliced 1/4 inch thick
    • 1 tablespoon tomato paste
    • 1 tablespoon unsalted butter
    • Chopped parsley, for garnish 
    1. Soak the morels in 1 1/2 cups of boiling water until softened. Rinse and pat dry; reserve the soaking liquid. In a skillet, heat 1 tablespoon of the oil. Add the sausages, cover and cook over moderate heat until no longer pink within; slice 1/4 inch thick. Heat the remaining oil in the skillet. Add the shiitake, season with salt and pepper and cook until softened. Add the shallots and morels; cover and cook for 4 minutes. Add the water chestnuts. Pour in the morel soaking liquid. Add the sausages and simmer for 2 minutes. Stir in the tomato paste. Season with salt and pepper. Off the heat, swirl in the butter and sprinkle with parsley. Serve over polenta.
    Source: Food & Wine, from What Sommeliers Know Best, published October 2010

    Talk to you tomorrow!  Bon appétit!

    Tuesday, September 21, 2010

    How-To Videos

    Readers, I want to compile a list of How-To videos that would help everybody and anybody in the kitchen, from how to separate an egg to how to score a duck breast.  Leave your comments!  Thank you so much!

    The Results and the Next Challenge - Day 6

    Skate, skate, skate!  One word: DELECTABLE!

    The Pan-Fried Skate with Brown Butter and Parsnip Purée recipe was wonderful.  I like skate for its look, but also because in terms of taste, it's like a cross between fish and sea scallops.  The brown butter was the perfect match for this dish, and the parsnip purée made every bite creamy and smooth.  I would have liked to have more of the brown butter though.  Maybe 6 tablespoons instead of 4 are in order, as well as a little more lemon juice.  I will definitely make this again!  Here is the recipe, from Ken Frank:

    Pan-Fried Skate with Brown Butter and Parsnip Purée
    • 6 tablespoons unsalted butter
    • 1 pound parsnips, peeled and sliced 1/4 inch thick
    • 1 1/2 cups water
    • Salt and freshly ground pepper
    • 1/3 cup sliced blanched almonds
    • Vegetable oil, for frying
    • Four 6- to 8-ounce boneless skate wings
    • All-purpose flour, for dredging
    • 3 tablespoons fresh lemon juice 
    1. In a medium saucepan, melt 2 tablespoons of the butter. Add the parsnips and cook over moderately high heat, stirring often, until golden brown, about 4 minutes. Add the water and a pinch of salt, cover and cook over low heat until the parsnips are tender, about 15 minutes. Uncover and boil over moderately high heat until the liquid is reduced to 1/4 cup, about 5 minutes. Transfer the parsnips and liquid to a blender and puree until very smooth. Return the puree to the saucepan and season with salt and pepper; cover and keep warm.
    2. Meanwhile, preheat the oven to 350°. Spread the sliced almonds in a pie plate and toast in the oven for about 7 minutes, until golden brown. Let cool.
    3. Reduce the oven temperature to 300°. In a large skillet, heat 1/8 inch of vegetable oil. Season the skate with salt and pepper and dredge in flour, shaking off the excess. Fry 2 pieces of skate over high heat until they are golden brown and crisp, about 3 minutes. Carefully turn and fry the skate until just opaque throughout, about 30 seconds longer. Transfer the skate to a large rimmed baking sheet and keep warm in the oven. Fry the remaining skate.
    4. Pour off the oil and wipe out the skillet. Add the remaining 4 tablespoons of butter to the skillet and melt over high heat. Cook the butter until it starts to turn brown, about 1 minute. Add the almonds and shake the skillet. Remove the skillet from the heat and swirl in the lemon juice.
    5. Spoon the parsnip puree onto plates and top with the skate. Drizzle the butter-almond sauce over the fish and serve. 
    Source: Food & Wine, from Best Pairings for California Wines, published October 2010

    Pan-Fried Skate with Brown Butter and Parsnip Purée

    Tonight, I am making the Mushroom-Sausage Ragù.  I really love mushrooms, especially morels and shiitakes, and this recipe is full of them!  Can't wait!  Talk to you tomorrow!  Bon appétit!

    Monday, September 20, 2010

    The Next Challenge - Day 5

    The week has started.  It's time to cook!  I made a batch of pasta sauce (good old Italian meat sauce) that I am in the process of canning right now.  I will start selling the goods, I have my first client picking up some jars tomorrow (thanks Tammy! :)

    Plus, tonight, the Food & Wine challenge resumes with Pan-Fried Skate with Brown Butter and Parsnip Purée.  Skate is a cartilaginous fish from the Rajidae family, it's a ray.  Here is a picture of the skate wing before I started the recipe:

    Skate wing (uncooked)


    Saturday, September 18, 2010

    My first furniture project!

    Here is my first project on furniture.  I bought this chair, painted it and re-upholstered it myself.  I love looking for different finds at second-hand store, thrift stores, "brocante" as we say in French.  They are the types of pieces that will make our home unique and personalized.  And each piece has a story.

    I am currently working on 3 antique lamps I found also at second-hand shops.  Pictures to come soon.  Stay tuned!

    After
    Before

    The Results - Day 4

    Today, it's Saturday.  There is no challenge!  I am taking a day off.  I will however tell you that yesterday's recipes were good.  The pasta lacked a bit of sauce for my taste, but it was overall tasty.  It was again very easy to put together, as well as the salad, which was also quite tasty, but I would omit the iceberg lettuce next time, as I am not a huge fan of it.

    I am including the recipes, as well as some pictures.

    Pasta all'Amatriciana
    • 3 ounces thickly sliced guanciale or pancetta (see Note), cut into 1/2-inch strips
    • 1 fresh red chile—stemmed, seeded and minced
    • 1 bay leaf
    • 1/2 cup dry white wine
    • One 28-ounce can whole tomatoes—tomatoes chopped, juices reserved
    • 3/4 pound dried pasta, such as bucatini, spaghetti or rigatoni
    • Freshly ground pepper
    • Freshly grated Pecorino Romano cheese 
    1. In a large skillet, combine the guanciale, chile and bay leaf and cook over moderately low heat until the fat has rendered and the guanciale is golden brown, about 5 minutes. Add the wine and simmer over moderate heat until it has reduced to 2 tablespoons, about 4 minutes. Add the tomatoes and their juices and simmer over moderately low heat, stirring occasionally, until the sauce is thickened, about 30 minutes. Discard the bay leaf.
    2. Bring a large pot of salted water to a boil. Add the pasta and cook over high heat until just barely tender. Drain the pasta and stir it into the sauce. Cook the pasta over moderately low heat, stirring occasionally, until al dente, about 2 minutes. Season with pepper. Spoon the pasta into shallow bowls, generously sprinkle with the grated Pecorino Romano and serve, passing more Pecorino cheese at the table. 
    Source: Food & Wine, from Eat and Drink Like a Roman, published October 2010

    Pasta all'Amatriciana

    The good thing with this recipe is that you can make the sauce in advance, and refrigerate up to a day.  Bring the sauce back to a simmer before adding the cooked pasta.  To know what guanciale is, click here.

    As for the salad, it reminded me of the nice big Italian salad they serve at Olive Garden.  I don't go there often, but when I do, I order the salad, since it's so good and full of flavors.  This one recipe was very similar, with many flavors all interlaced, exploding in the mouth.  I had to add a little more salt to the vinaigrette, even though it doesn't require in the recipe.  I would also put a little more garlic next time, instead of 1 clove, maybe 2.

    Big Italian Salad
    • 1 garlic clove, smashed
    • Salt
    • 2 tablespoons mayonnaise
    • 2 tablespoons red wine vinegar
    • 1/2 teaspoon dried oregano
    • 1/4 cup plus 2 tablespoons extra-virgin olive oil
    • Freshly ground pepper
    • 1 large romaine heart, chopped
    • 1 small head of radicchio—halved, cored and coarsely chopped
    • 1/4 head of iceberg lettuce, coarsely chopped
    • 1 tender celery rib, thinly sliced
    • 1/2 small red onion, thinly sliced
    • 1/2 cup cherry tomatoes
    • 1/4 cup pitted green olives, preferably Sicilian
    • 8 peperoncini
    • 2 ounces Parmigiano-Reggiano cheese, shaved (1 cup) 
    1. In a large bowl, mash the garlic to a paste with a generous pinch of salt. Whisk in the mayonnaise, vinegar and oregano, then whisk in the olive oil. Season with pepper. Add all of the remaining ingredients and toss well. Serve right away.
    Source: Food & Wine, from Fast Recipe Makeovers: Italian-American Favorites, published October 2010

    Big Italian Salad (before mixing)


    Have a great rest of the weekend readers and let's get cooking tomorrow night!

    Friday, September 17, 2010

    The Results and the Next Challenge - Day 4

    Yesterday was a great day!  The condo smelled like meat braising in red wine for the most part of the day, it was delightful!  The recipe, as I mentioned in a previous post, was simple enough to be put together even by the most inexperienced cook.  It all went down pretty good, except that when it was time to reduce the remainder of my sauce in order to obtain 2 cups, I already had less than 2 cups to work with.  But seeing that the consistency of the sauce was quite nice, I did not bother to let it reduce.

    The sauce was in fact velvety, creamy and decadent!  My ribs were fantastic, however, make sure you get a nice cut of meat, with enough fat, but not too much.  I have to say mine were a little fatty, but I love fat, so it was all good for me.  Rama had to push some pieces aside though (that I ate behind his back before cleaning up the plates!)...  I told you I love fat!

    So in honor of that great and easy recipe from Chef Ken Frank of La Toque in Napa Valley, here it is:

    Easy Short Ribs Braised in Red Wine

    • 1 tablespoon unsalted butter
    • 1 medium onion, finely chopped
    • 1 large celery rib, finely chopped
    • 1 large carrot, finely chopped
    • 2 tablespoons tomato paste
    • 2 tablespoons all-purpose flour
    • One 750-milliliter bottle dry red wine
    • 2 cups veal or chicken stock
    • 2 tablespoons vegetable oil
    • Four 2-inch-thick, flanken-cut short ribs with bone (2 3/4 pounds)
    • Salt and freshly ground pepper
    • Buttered egg noodles, for serving 
    1. In a large, enameled cast-iron casserole, melt the butter. Add the onion, celery and carrot, cover and cook over moderate heat until slightly softened, about 5 minutes. Uncover and cook until the vegetables are lightly browned, about 3 minutes longer. Stir in the tomato paste. Add the flour and cook for 1 minute, stirring. Add the wine and veal stock and bring to a simmer.
    2. Meanwhile, heat the oil in a large skillet until shimmering. Season the ribs with salt and pepper, add them to the pan and cook over moderately high heat, turning, until they are well browned, about 15 minutes.
    3. Transfer the short ribs to the casserole. Partially cover and cook over moderately low heat until very tender, about 2 hours.
    4. Transfer the ribs to a plate and remove the bones. Strain the sauce into a heatproof measuring cup and skim off the fat. Return the sauce to the casserole and boil until reduced to 2 cups, 10 minutes. Return the meat to the sauce and simmer over low heat until heated through. Serve the ribs with egg noodles. 
    Easy Short Ribs Braised in Red Wine
    I served mine with sauteed kale for extra greens.  It's easy too.  You sauté kale in olive oil, until starting to soften, then you add 2-3 minced cloves of garlic, the juice of a small lemon and salt and pepper.  It's a great side dish for any meat recipe, it's easy and kale is considered a super food.

    Another great thing about this recipe, and red wine slow-cooked meat in general, you can make the recipe up to five days in advance and refrigerate the meat in the sauce until ready to eat.  Reheat gently in the oven.

    On to my next challenge now.  It's Friday.  I want to take it easy, like probably most of you.  And for me easy = pasta!  So in keeping with the Italian flavored issue of Food & Wine for October, I will prepare Pasta all'Amatriciana.  I will serve the Big Italian Salad as an appetizer/side dish.  Buono appetito!

    Recipe for Mixed Vegetable and Farro Soup

    As per the request of a reader, here is the recipe for Mixed Vegetable and Farro Soup:

    Mixed Vegetable and Farro Soup

    • 3 tablespoons extra-virgin olive oil
    • 2 celery ribs, thinly sliced
    • 1 medium onion, thinly sliced
    • 1 medium leek, white and pale green parts only, thinly sliced
    • 1 cup farro or wheat berries
    • 1 tablespoon tomato paste
    • 2 quarts water
    • One 15-ounce can borlotti or pinto beans, drained and rinsed
    • 2 large carrots, halved lengthwise and sliced crosswise 1/4 inch thick
    • 1 1/2 cups frozen peas
    • Salt and freshly ground black pepper
    • 2 tablespoons thinly sliced basil

    In an enameled cast-iron casserole, heat the oil. Add the celery, onion and leek and cook over moderately high heat, stirring a few times, until softened, 5 minutes. Add the farro and tomato paste and cook, stirring, until the grains are coated and shiny, 30 seconds. Add 1 quart of the water and the beans and bring to a boil. Simmer over low heat for 30 minutes. Add the carrots and the remaining 1 quart of water. Cover and cook over low heat until the carrots are tender, 30 minutes. Add the peas, cover and cook until tender, 5 minutes. Season with salt and pepper, top with the basil and serve with Juniper Grissini.

    Source: Food & Wine, from Mario Batali's Passport to Eataly, published October 2010

    Thursday, September 16, 2010

    The Results and the Next Challenge - Day 3

    Yesterday was the Mixed Vegetable and Farro Soup, a recipe from Eataly's vegetable counter.  The recipe is vegan, and it's too bad, but it made the vegan food's bad reputation become true, at least for one night.  Here's the DL:

    So the soup is quite easy to make, not too much active time, however, it is tasteless.  I followed the directions to the letter, until my final taste, where I added wayyyy more fresh basil, and more salt and pepper.

    However, surprise, surprise, when I had a bowl for lunch today, probably because the ingredients blended overnight, it was quite tolerable.  I can even say that it slowly grows on you!

    Mixed Vegetable and Farro Soup

    As for my main course, I cooked the Chicken Scarpariello.  That dish, on the other hand, was a complete success!  So easy to whip up, so tasty, it reminds me of a Kotopoulo me Dendrolivano recipe I make all the time.  When you compare the taste and the technique behind both recipes, you can really feel the Mediterranean influence.  The chicken was so tender, the sauce rich and creamy and use of the jarred Peppadew peppers makes it a wonderful weeknight recipe.  It is however extremely suitable for company.

    One tip I can give you though is to form the thighs in little packets by folding the ends under the front part before placing in the hot oil.  This way, you have a great finished product and the thighs retain their juices while cooking.  Oh and I want to add that I made the recipe in advance, put in a 200-degree oven and served approximately 1 hour later, and it was perfect!  I am including the recipe here:

    Chicken Scarpariello
    • 8 small skinless, boneless chicken thighs (2 pounds)
    • Salt and freshly ground pepper
    • All-purpose flour, for dusting
    • 1/2 cup extra-virgin olive oil
    • 8 garlic cloves, halved lengthwise and lightly smashed
    • 4 large rosemary sprigs, broken into 2-inch pieces
    • 2 cups chicken stock or low-sodium broth
    • 2 tablespoons fresh lemon juice
    • 2 tablespoons unsalted butter
    • 1/2 cup Peppadew peppers or other pickled peppers, sliced
    1. Season the chicken with salt and pepper and dust with flour. In a large skillet, heat the oil until shimmering. Add the chicken and cook over high heat, turning once, until browned and crusty on both sides, about 10 minutes. Add the garlic and rosemary and cook for 3 minutes, until the garlic is lightly browned. Transfer the chicken to a platter, leaving the rosemary and garlic in the skillet. 
    2. Add the stock to the skillet and cook over high heat, scraping up any browned bits, until reduced by half, about 5 minutes. Add the lemon juice and butter and swirl until emulsified. Return the chicken and any accumulated juices to the skillet. Add the peppers and cook, turning the chicken until coated in the sauce, about 3 minutes. Transfer the chicken and sauce to the platter and serve. 
    Source: Food & Wine, October 2010 (or at http://www.foodandwine.com/recipes/chicken-scarpariello)

    Chicken Scarpariello

    On the menu tonight: Easy Short Ribs Braised in Red Wine.  I am a huge fan of short ribs, so this recipe was calling my name from the start.  It is on the stove right now, and the whole condo smells amazing.  I love slow-cooking meat in red wine, a lot of red wine.  The recipe again is very easy to put together, easy enough for someone who doesn't cook.  More details on the taste tomorrow.

    Until next time, bon appétit!

    Wednesday, September 15, 2010

    The Result and the Next Challenge - Day 2

    Ok, so last night's recipe did not turn out that great...  The Chive purée was kind of bland, the fish as well, with just that coat of Dijon, and the potatoes did need that chive purée to really stand out.  The presentation was also monochromatic.  I will not try this recipe again and I give it a 1/5.

    So for my second night, I will be making Chicken Scarpariello, a chicken sauteed in a lemon glaze with peppers, as well as Mixed Vegetable and Farro Soup (from the Vegetable Counter at NYC Eataly).  Both seem easy to execute and the chicken is a quick dish perfect for a weeknight dinner.

    I always love making a soup, eat it for dinner and freeze the rest.  Soups are amazing for lunch during the weekend, when people don't really take time to eat lunch, because they had breakfast so late.

    More details about the success tomorrow!

    Tuesday, September 14, 2010

    Sucre à la crème... Or little sugar squares!

    Ohhhhh so good are these little French Canadian treats!  You can literally translate "sucre à la crème" for "creamy sugar", however, the Office québécois de la langue française uses the term "maple fudge".  There are in fact recipes that call for the use of maple syrup.  Maybe I will try one of those.


    Anyway, from as far as I can remember, sucre à la crème has always been a special treat, available at special occasions, like during the Holidays, or if you were really lucky, your grandma or great-aunt would have some handy at all times.  For this reason, I always thought they were so difficult to make.  My mom would make some once in a while, and they would disappear in a matter of hours if she did not keep an eye on me.  I almost forgot about them when I moved to the States, until I made my own.


    It is not hard or complex to make, it is just time-consuming and hard on the arms (if you make the recipe, you'll know exactly what I'm talking about!).  There are as many recipes as there are grandmas, some recipes have even been adapted for the microwave.  I however prefer the old-fashion way, requiring a thermometer and a dose of patience.  Here is my foolproof recipe:


    Classic "Sucre à la crème"

    • 1 cup sugar
    • 1 cup brown sugar, packed
    • 2/3 cup cream 10%
    • 2 tablespoons unsalted butter
    • 1 teaspoon vanilla extract
    • 1/2 cup walnuts or pecans, coarsely chopped (optional)
    1. In a small heavy saucepan, mix the sugar, brown sugar and cream. Bring to a boil, stirring occasionally with a wooden spoon. Install a candy thermometer on the side of the saucepan, ensuring it doesn't touch the bottom, but that the tip is well immersed in the mixture. Let boil, undisturbed, until the thermometer registers 236°F (113°C).
    2. Remove the saucepan from the heat. Add the butter and vanilla (do not stir) and let cool down until the thermometer registers 110°F (43°C), about 45 minutes.
    3. Remove the thermometer from the saucepan. With a clean wooden spoon, stir heavily non-stop for about 3 to 5 minutes, or until the mix starts to lose its gloss. Add the nuts or pecans if using and mix well.
    4. Immediately spread the mixture into an 8in x 4in mold, covered with parchment paper (ensure you smooth the top). With the tip of a knife, trace lines on top of the mixture in order to obtain 32 squares. Refrigerate at least an hour. With a very sharp knife, cut in squares.
    5. (You can keep the squares in between parchment paper sheets in a hermetic container. They will keep for 2 days at room temperature, 2 weeks in the fridge and up to 2 months in the freezer.)

    If you decide to make the recipe, please let me know what you think.  If you prefer to salivate over it, and want to still taste them, I am adding them to my menu for Haute Cuisine To-Go, so please send me an email to hautecuisinetogo@gmail.com to place an order.  Bon appétit!

    Cooking Food & Wine October 2010 - Day 1

    Starting today, I will be cooking all the main courses from Food & Wine magazine, issue of October 2010.  I am starting today with Mustard-Glazed Black Cod with Fingerlings and Chive Purée.  Stay tuned to see how each recipe turns out, the ups and downs, the pitfalls, suggestions, pairings, pictures, and more!

    See you soon through Food & Wine!

    Saturday, September 11, 2010

    How this blog started...

    Of course, I want to write about how this blog came about...  The first few words that come to mind are: creativity overflow.

    A few weeks ago, I decided I wanted to bring an idea to life.  I want to cook for others, but not only as a past-time, but as a daily occupation.  I never dreamed of being a caterer, I never dreamed of working in a restaurant either (although sometimes, I would trade a lot to be able to own my own restaurant).  But I adore cooking.  I love the idea of pleasing people with food.  It might even be a little egocentric on my part.  I love seeing people eat and the very idea of feeding people turns me on, in the proper sense of the term.

    So the idea of Haute Cuisine To-Go came to life.  How could I cook for people, make them discover that real food, "cooked from scratch", was something they could feed their lives of, even if they themselves detested cooking or simply did not have the time to do so?  I decided I would become a recipe-maker.  Plainly.  I would challenge people to submit a recipe to me, something they had wanted to taste for a while, something they saw on the Food Network, or in Bon Appétit...  Something that made them want to really stay in, open some wine, and enjoy the pleasure of a home-cooked meal, without having to spend 3 hours of their precious time cooking.  Because let's face it, we are less and less inclined to do so, and the market is now satisfying the needs of the masses with aisles and aisles of already-prepared meals and boxed food.

    But I also think that our health resides in that very scary "home-cooked meal".  We hear about organic, local, seasonal, cage-free, free-range, etc., but if we just started eating fresh and home-cooked meals more, as a society, we would observe tremendous change.

    So today, I want to first declare my love of food.  This blog will be a work-in-progress.  Some type of everyday creative journal, about what I cook, what I create, what I feel about it all.  It will be very personal and quite possibly boring for most of you.  But if one day I cook for you, you will know how that love of cooking came about.